
Scrunchies are a good way to use up old scraps
Scrunchie Tutorial
Materials you'll be needin'
A Pony Tail Holder
Scrap fabric
A sewing machine or needle and thread
1. First get out your scrap fabric:

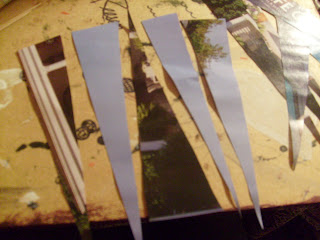
2. Cut a strip (or strips depending on many you want to make) that are 8 inches by 4 inches, like so:

3. Fold those strips in half long wise, good side together (the side you want your scrunchie to be inside) and make a seem along the longer side, I usually make a double seem just to make sure its nice and strong.

4. Here's where we're gonna flip the fabric right side out. Take a safety pin and pin it to one side of the tube you've just created, make sure to only pin one layer of the fabric.

5. Take the pin and push it back through the fabric tube you have created, and pull it all the way through until it comes out the other end. Pull until all the fabric is right side out. This will give you a very neat looking tube.

 Finished Tube completely right side out ^
6. Now take you pony tail holder and cute it in half along the seem(cut out the metal if there is any)
7. Pin one side of the cut pony tail holder to on end of the tube and put one safety pin on the other end of the pony tail holder so it looks like this:

8. Push the end of the pony tail holder not connected to the scrunchie case through the case to the other side and pin the two ends together so they don't go back through; and hand sew the two ends together tightly.

9. Now carefully hand sew the two ends of the scrunchie together overlapping one side over the other so that you have a neat seam and your done!!

Hope my instructions were clear!!
~Courtney
P.S. I weren't sure how to spell scrunchie because I never need to spell it, but I tried my best and I'm just assuming that's how it's spelled, so if it's not sorry!!


.jpg)